NetSuite, Implementation, Open Transactions
January 10, 2024
7 min Read
Introduction
Importing open accounts payable (AP) transactions during a NetSuite implementation is required to begin paying outstanding bills in NetSuite. This article will discuss preparing and uploading the closing AP balance from your legacy system into NetSuite. The screenshots I use are from QuickBooks Online. However, the approach will be the same, regardless of the legacy system.
This post is relevant for companies migrating data using a net change or summary trial balance approach for historical financial statements. Loading open AP transactions won't be necessary if you upload detailed transactions. Check out this article to learn how OptimalData consulting loads detailed transactions.
Before getting started, you should complete the following:
-
Apply any vendor payments, vendor credits, and journal entries against open vendor bills and journal entries. Journal entries are often involved with contra-AP balances.
-
Add the entity to any journal entries missing a name. If the entries net to zero, exclude them from the import.
-
Create a suspense account to post the open AP transactions' general ledger (GL) impact. This account can be named OPENAP and configured as an equity account type.
Why do I need a suspense account?
You imported the monthly financial statements with a journal entry. This entry recorded the original GL impact for all historical transactions, including unpaid AP transactions.
We would not have individual transactions available to pay if we stopped there. We need to create our unpaid vendor bills. But, this makes a posting transaction, which will generate a variance in our financial statement tieout. We need a method to get the individual transactions into NetSuite without making a difference between our two systems.
The solution is the suspense account. When we create the vendor bill, we will debit the suspense account. NetSuite will automatically post the credit to accounts payable. Then, after loading all open-AP transactions, we will post a journal entry to debit accounts payable and credit the suspense account. This entry will offset the GL impact of the AP transactions and clear the fictitious vendor AP balance created by the net change entries.
How to import your open-AP transactions
1. Get the data from your legacy AP detailed aging report
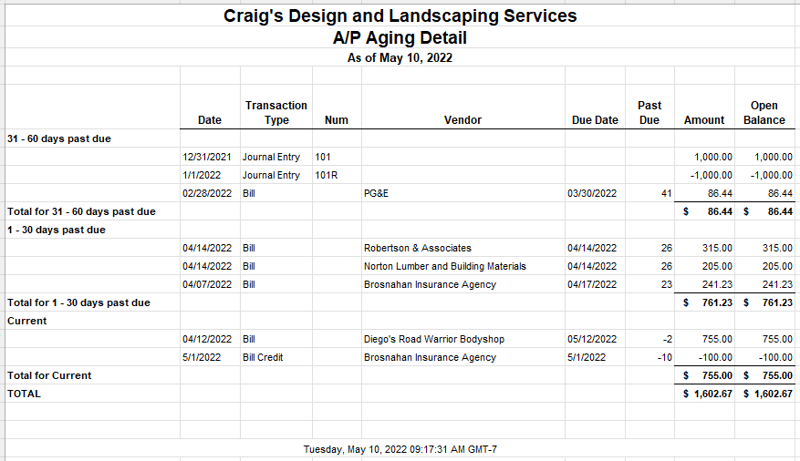
First, navigate to the AP detailed aging report. In QuickBooks Online, the out-of-the-box list should include all the needed data. However, if you have vendors with non-USD currencies, you might need to add the currency and open balance foreign currency columns to the report.
Export the report to Excel. Remove the headers, footers, subtotal and total lines, and blank columns. Finally, remove the amount column. We want to use the open balance column if you have partially paid bills. See the screenshots below for a before and after look.
The final check to validate that the file is complete and accurate is to compare our data file to the NetSuite and QuickBooks AP balance at the go-live date.
Before updating:
 After updating:
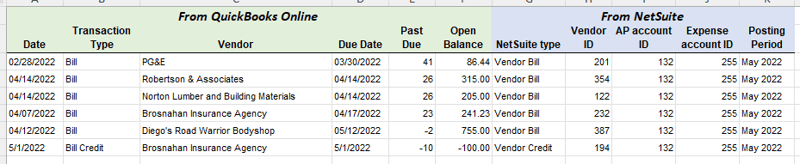
2. Add the NetSuite segment values to the data file
Next, we need to add the NetSuite-specific segment values to our file. Users should:
-
Map the transaction type - Transactions impacting AP are about a 1:1 match with NetSuite. If you can't import a transaction type, I usually recommend loading it as a journal entry. Each NetSuite transaction type will need a separate CSV upload template.
-
Map the vendors - The vendors with an existing balance should exist in QuickBooks and NetSuite. See my article on the segment map file for more details.
-
Add the account - Add the AP and OPENAP suspense accounts to the upload file. Alternatively, you can hardcode the account when using a single AP account.
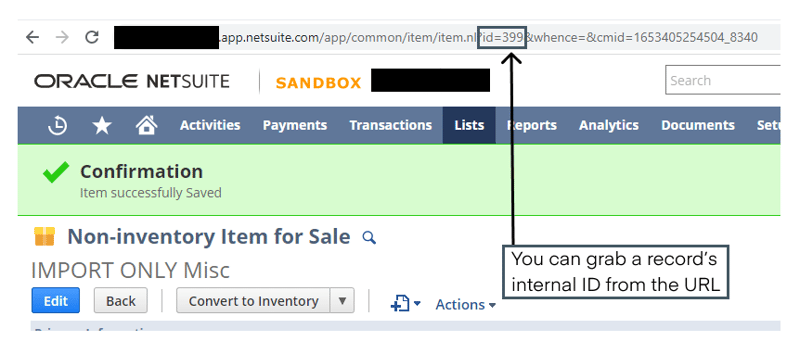
When I load CSV templates into NetSuite, I map based on the internal ID instead of the name. The templates are very particular, and the most negligible difference will cause an error. The risk of a typo is lower when using the internal ID. In this article, you can find instructions to add internal IDs to NetSuite lists. You can also find this on the URL of any record in NetSuite. See the screenshot below.
 3. Put together the transaction CSV upload files
We are ready to build the CSV upload files. Filter the data file by transaction type and copy and paste it into a new CSV file. Be sure and include any required fields in the template. To navigate to the upload page, go to Setup -> Import/Export -> Import CSV records.
Here are a few tips when working with CSV upload templates:
-
Talk with your implementation partner to get the CSV upload templates. Or, you can download my CSV transaction guide here.
-
Review the transaction form on the appropriate NetSuite page. Include any required fields (indicated with an asterisk) on the template.
-
Always load a single transaction first to validate the upload worked and ensure the transaction didn't get stuck in a workflow. You can check this by reviewing the transaction status.
-
Save the upload template. It will probably take a few attempts to load your transactions successfully. The templates are finicky!
-
Don't forget to adjust the upload file on the Field Mapping page to map based on the internal ID. NetSuite defaults to mapping fields based on the name.
4. Validate that all vendor balances are correct
After loading, run the AP summary aging report from the legacy system and NetSuite. Use a SUMIF formula to compare the balances between each report. We have not addressed the fictitious AP vendor balance created by net change entries. All other vendors should match.
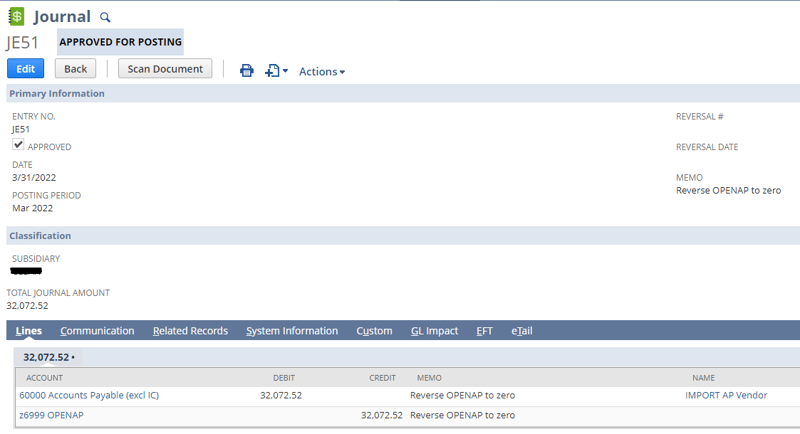
5. Reverse the fictitious vendor's AP balance
The next step is to reverse the fictitious vendor's AP balance and OPENAP suspense balance with a journal entry. Again, you must include the fictitious AP vendor name on the AP side of the journal entry. After posting this entry, your AP balance will match the legacy system, and the OPENAP suspense account will have a zero-dollar balance. See the example journal entry here.
6. Deactivate the appropriate records
Finally, you should deactivate the fictitious vendor record and the OPENAP GL account (assuming the balance is zero). Before deactivating the vendor account, navigate to the Pay Single Vendor page, select the vendor, and mark all the journal entries for payment. This action should result in a zero-dollar transaction with no GL impact. Once this is complete, deactivate the vendor.
Final reminders for loading the open accounts payable balances
Here are a few final tips & tricks to get your data migrated into NetSuite correctly:
-
If the balances do not tie, confirm you used the open balance, not the amount column. Also, check for any foreign currency balances.
-
After the go-live date, your staff might be confused about the OPENAP account. I've had to clean up mistakes because a staff accountant changed this. If you deactivate the account, you prevent this from happening.
-
Set the posting period on all open transactions to the go-live period, regardless of the date of the transaction. This tip will ensure that the GL impact of the OPENAP account impacts one accounting period. I've had issues with this in the past.
Closing
This post discussed the steps to load your open accounts payable transactions during a NetSuite implementation.
You might be interested in my other NetSuite data migration resources:
-
My QuickBooks Online to NetSuite data migration course provides informational, step-by-step video instructions from start to finish during a QuickBooks to NetSuite transition.
-
My transactional CSV guide with templates to eight common transactions imported into NetSuite.
-
My other blog posts include importing your open accounts receivable transactions and open bank transactions.
-
My implementation resource page includes other tips & tricks for executing a successful NetSuite implementation.