NetSuite, Administration, Internal Controls
January 10, 2024
3 min Read
Looking for tips, tricks, and how-to articles on reporting in NetSuite? Check out our NetSuite Reporting Resource page.
Once an organization is public, financial controls are put into place to ensure compliance with financial regulations. All US publicly traded organizations must comply with the Sarbanes-Oxley Act (or SOX). Therefore, system controls are a significant feature for moving from QuickBooks to NetSuite. This blog post will discuss how to leverage NetSuite's saved search functionality to automatically distribute a list of new and modified segment values used in your SOX control environment.
Before starting, a quick overview of the System Note functionality. First, here is the language from the NetSuite Help Center:
System notes track changes made to a record and to general configuration settings that have a financial impact. A system note for a change on a record captures the date when the change was made, who made the change, the role of the user who made the change, the type of change, and the old and new value in the record.
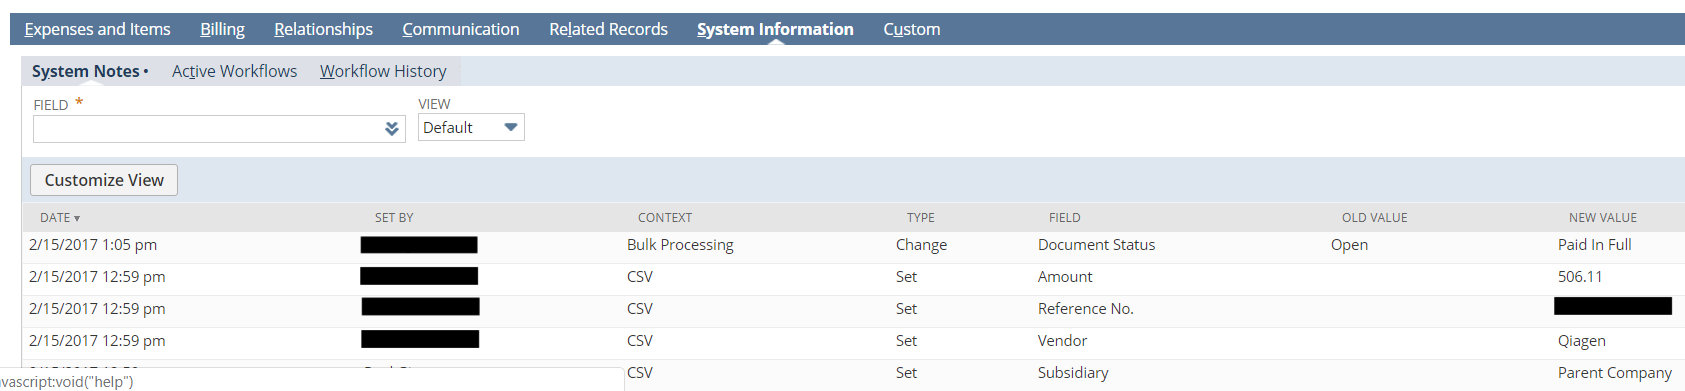
Almost all records within NetSuite have a System Note subtab with this information. In my experience, this feature is helpful when investigating if a transaction looks off. We will build a saved search to query this data in our report.
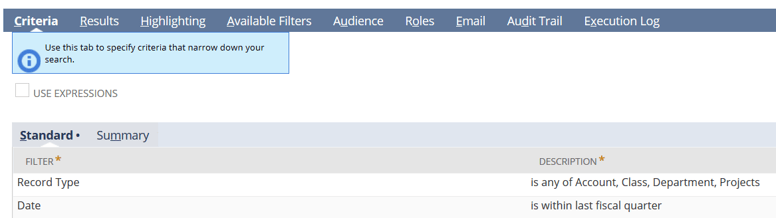
First, navigate to Reports->New Search and select the 'System Note' option. Next, check the 'Use Advanced Search' checkbox.
Complete the following on the Saved Search:
-
Select the applicable Record Types in the Criteria filter. Potential example record types are Account, Department, Class, Location, and Subsidiary.
-
Add a date range, such as last month or last quarter.
-
Consider excluding changes made via integration by using the Context filter.
-
Include the Record Type on the report results. The out-of-the-box Results subtab excludes this field.
Finally, click on 'Create Saved Search,' add a name to the search, and click the blue 'Save & Run' button. Then, review the results and click 'Edit this Search' to make any other changes.

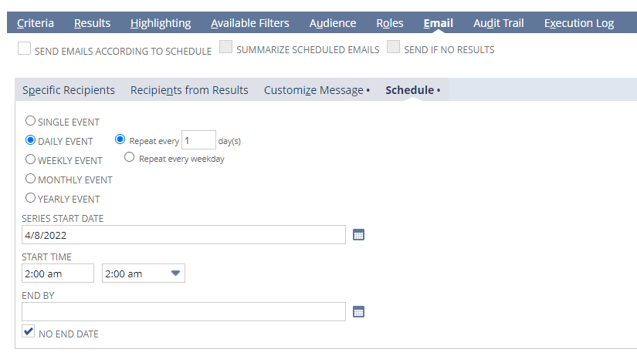
Navigate to the 'Email' sub-tab to set up automated report distribution while editing the saved search. Distribution options include:
-
The 'Specific Recipients' subtab allows us to select who receives the distributed report. Note that the recipient must be set up as a user with a valid email to receive the message.
-
The 'Customize Message' subtab allows us to add text to the email and set how NetSuite should distribute the saved search results. I'd recommend setting this as an Excel file.
-
The 'Schedule' subtab allows us to set the report distribution timing. I'd match this to the date range included above. Users should set quarterly distributions to a monthly event occurring every three months.
 Are you looking to improve efficiencies and SOX compliance within your NetSuite environment? Then, subscribe to our blog today for additional tips & tricks.